How to Verify Emails in Mailchimp
Mailchimp keeps your audience organized, but it does not fully verify every mailbox before a campaign sends. A typo, a stale signup, or an abandoned work address can sit in a segment until it bounces, affects deliverability, and ties up contact capacity. This workflow shows how to export the exact audience or segment you plan to email, verify it with VeriMails, then re-import and tag only the clean contacts for future campaigns.
TLDR
- Export the smallest Mailchimp group that matches the send: a saved segment, a tag, or the full audience for a scheduled hygiene pass.
- Use the subscribed CSV for normal campaigns, and keep Email Address plus any merge fields or tags you need for the re-import.
- Verify the CSV in VeriMails, download valid contacts separately, and keep invalid, catch-all, disposable, and role-based results out of the regular campaign segment.
- Re-import the valid file, match Email Address to Mailchimp's email field, choose Update existing contacts when appropriate, and add a tag such as verimails-valid or verified-2026-05.
- Check Import history after the import so added, updated, skipped, syntax-error, invalid, and role-based rows are reconciled before the segment sends.
- Create future Mailchimp campaign segments from the verification tag so every send starts from a clean, recent audience.
Why Verify Your Mailchimp Contacts
Mailchimp gives you the audience structure, import tools, tags, groups, and segments needed to run campaigns. Verification fills the gap before the send: it checks whether each address in the exported CSV can actually receive mail.
Contact count has a real cost
Mailchimp defines subscribed, unsubscribed, and non-subscribed contacts as part of your contact count, while archived, cleaned, and deleted contacts do not count toward the marketing plan price. That makes hygiene more than a deliverability issue. If a segment contains old addresses that are still counted, verifying and archiving the ones you no longer want to mail can keep the audience closer to the plan tier you intended.
Mailchimp cleaning happens after a bounce
Mailchimp marks hard-bounced or repeatedly soft-bounced addresses as cleaned, and cleaned contacts cannot receive future campaigns. That is useful protection after a problem is detected, but it is still reactive. A verification pass catches the likely hard bounces before they hit mailbox providers and before they distort campaign reporting.
Imports are not the same as verification
Mailchimp's import flow can reject malformed addresses and some obvious problem addresses, but it is not a full SMTP deliverability check for your whole file. VeriMails tests syntax, DNS, MX records, live SMTP response, catch-all behavior, disposable domains, and role-based addresses before the contacts go back into Mailchimp.
Tags make the cleanup operational
The highest-value change is not just exporting and cleaning once. It is adding a durable Mailchimp tag to the contacts that passed verification, then building segments from that tag. Your next campaign can target recently verified contacts without re-solving the same spreadsheet problem.
What VeriMails Checks
VeriMails runs each address through a layered verification process so your Mailchimp import is based on deliverability, not just spreadsheet formatting.
Syntax validation catches malformed addresses before any network checks run. MX and DNS checks confirm the domain exists and is configured to receive mail. A live SMTP handshake checks whether the mailbox accepts mail without sending a message, which is the key step for catching abandoned or typo addresses before they hard-bounce.
Catch-all detection identifies domains that accept every address, so those contacts can be kept in a controlled Mailchimp segment instead of mixed into your normal campaign list. Disposable detection flags temporary inbox providers. Role-based detection marks shared addresses such as info@, support@, and sales@ so you can decide whether they belong in a marketing campaign or only in operational outreach.
Pricing for Mailchimp Users
VeriMails pricing is built for routine list hygiene. Verification starts at $0.0019 per email, so a 10,000-credit pack costs $19. Larger packs scale up to 5 million verifications for $1,499, and credits never expire.
Annual plans start at $12.50/month when billed yearly when you clean Mailchimp audiences on a regular schedule. Every new account starts with 100 free credits and no credit card required, which is enough to test a sample export before buying a pack.
For Mailchimp users, the useful comparison is campaign risk and contact-count cleanup. A 25,000-row cleanup costs under fifty dollars at one-time credit-pack pricing. If it prevents a bounce-heavy send or helps you archive contacts that no longer belong in the audience, verification becomes part of routine audience hygiene rather than a standalone billing shortcut.
The Workflow Preview
The flow below shows the Mailchimp export, VeriMails cleanup, and re-import steps a marketing team should expect before sending to a cleaned segment.


Step-by-Step
Choose the export scope
Open Audience in Mailchimp and choose the audience you want to work with. Export the full audience for a hygiene pass, or export a saved segment/tag when the goal is to clean one campaign group. Mailchimp exports may arrive as a ZIP with separate CSVs for subscribed, non-subscribed, unsubscribed, and cleaned contacts, so choose the CSV that matches the campaign status you actually plan to send to.
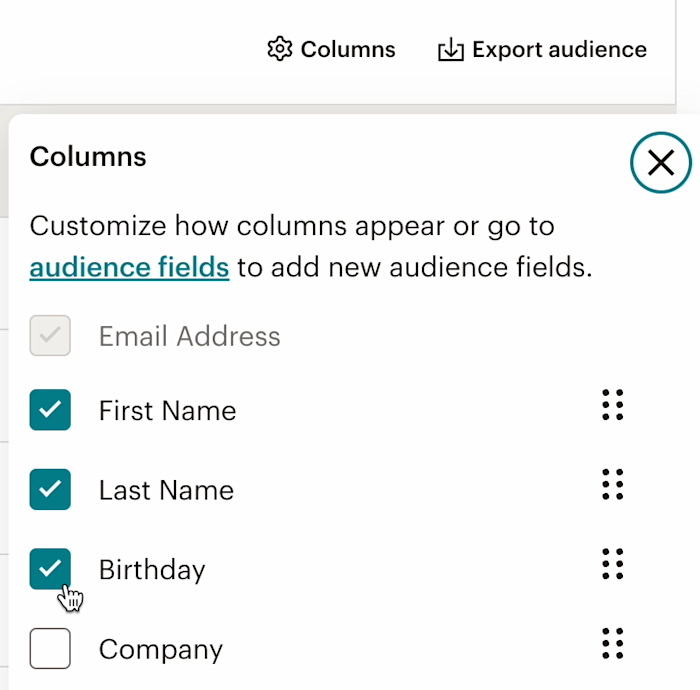
Prepare the Mailchimp CSV
Keep the Email Address column, because Mailchimp requires it for import matching. Also keep First Name, Last Name, existing tags, groups, and merge fields that the campaign needs. Remove columns you do not want to update, especially if you will check Update existing contacts later, because blank fields can overwrite stored data.
Upload the CSV to VeriMails
Sign in to VeriMails, open bulk verification, and upload the Mailchimp CSV. VeriMails detects the email column automatically and returns statuses for valid, invalid, catch-all, disposable, and role-based contacts. A mid-sized campaign export can be verified in minutes instead of being discovered by campaign bounces.
Download valid and review files
Download the valid results as the clean import file. Keep invalid, disposable, catch-all, and role-based results in separate files. Existing invalid subscribed or non-subscribed contacts can be archived if you no longer need them, or tagged as invalid and excluded from sends if you need an audit trail. Catch-all and role-based records can be kept in review tags if you still want controlled outreach.
Re-import and tag clean contacts
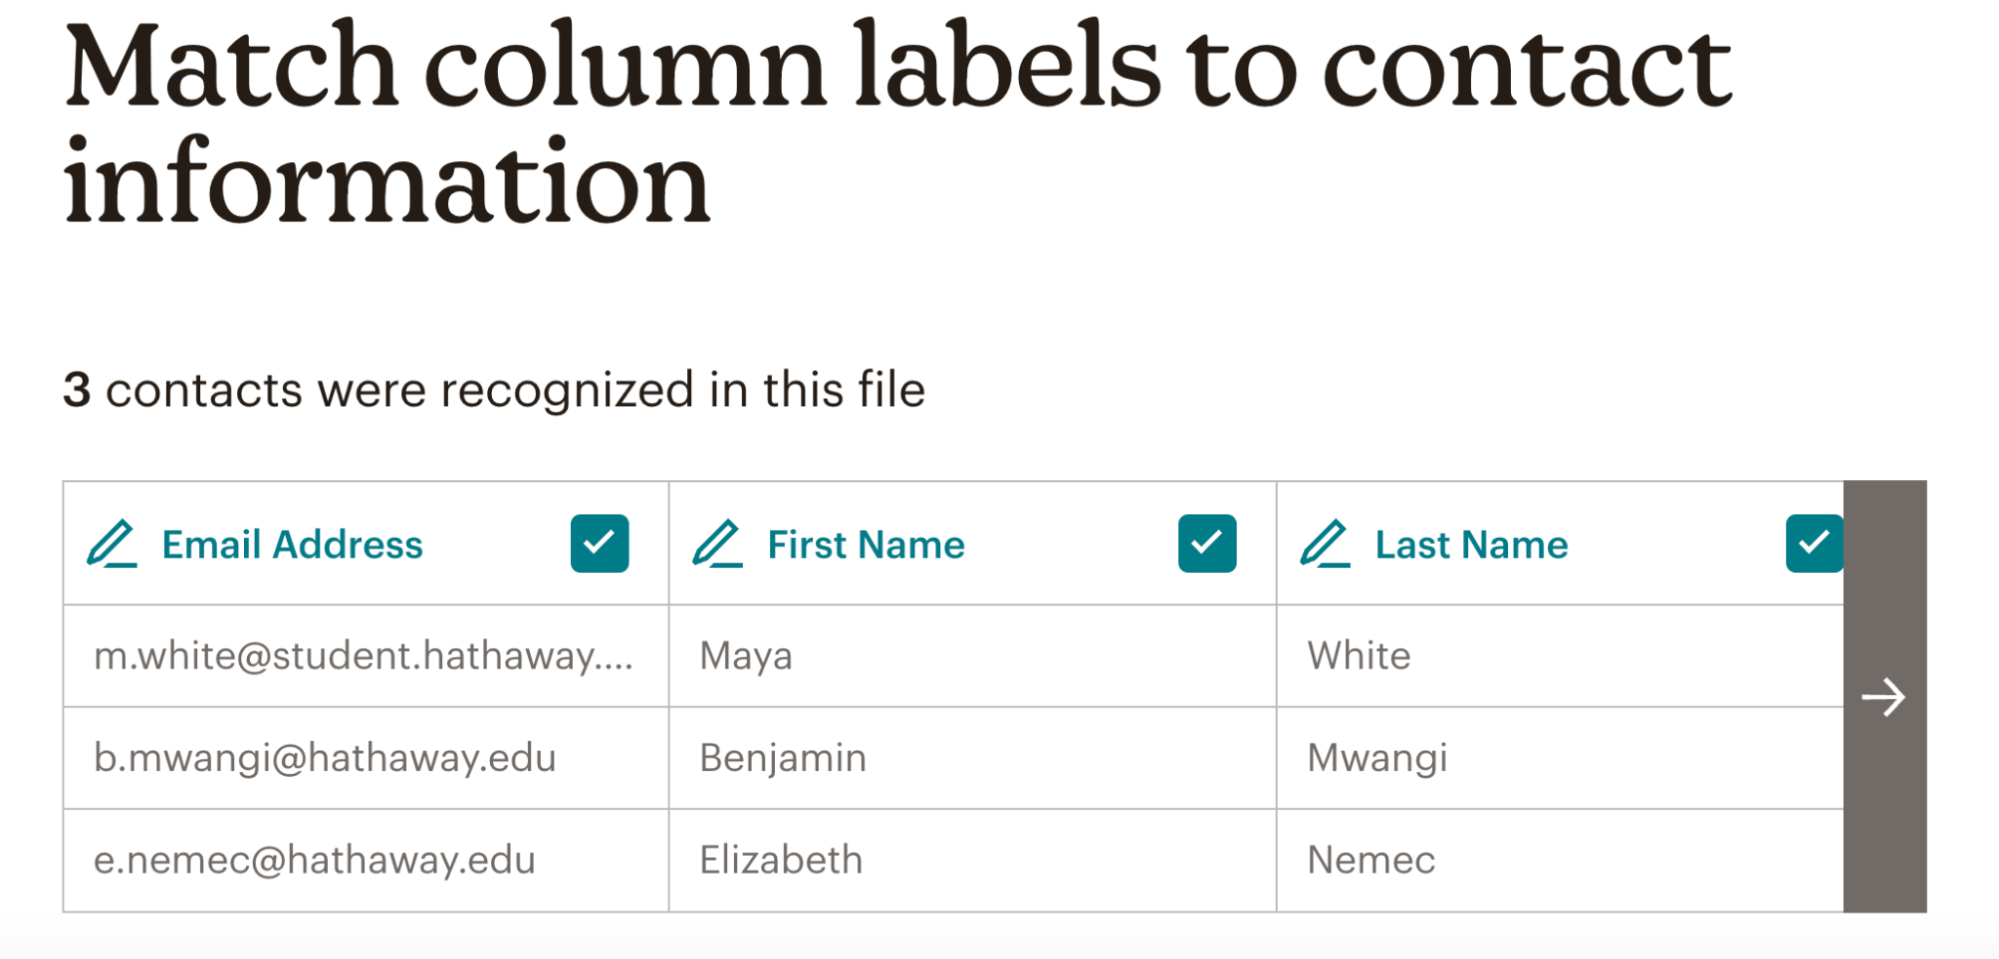
In Mailchimp, choose Add contacts, then Import contacts, upload the valid CSV, confirm the audience, and choose Update existing contacts only when you intend to update existing subscribed or non-subscribed records. Add tags such as verimails-valid and verified-2026-05, match Email Address and any merge fields, then finalize the import.
Build the send segment from the tag
After the import finishes, check Import history for added, updated, skipped, syntax-error, invalid, and role-based counts. Mailchimp keeps affected import-error addresses available for 24 hours, so reconcile the report immediately. Create a campaign segment where the verification tag is present, then exclude catch-all, disposable, role-based, and invalid review tags from normal marketing sends.
Repeat before imports and major sends
Verify every purchased, partner, event, or form-exported list before it enters Mailchimp. For existing audiences, repeat the hygiene pass every few months, and more often for high-volume signup forms or webinar lists that collect many temporary or typo addresses.
What to Do With Each VeriMails Result
The verification result should decide the Mailchimp action. Do not import every status back into one campaign segment.
| Result | Mailchimp Action | Campaign Check |
|---|---|---|
| Valid | Import or update in Mailchimp, add verimails-valid and a dated verification tag, and use that tag as the source for your next campaign segment. | Confirm Email Address is mapped and the verification tag appears in the audience. |
| Invalid | Do not send. If these came from an existing audience export, archive them if you no longer need them, or tag them as invalid and exclude that tag from future campaigns. | Check the invalid count against the removed or excluded count. |
| Catch-all | Keep separate from valid contacts. These domains accept broad SMTP probes, so the individual mailbox is not confirmed. | Use only in controlled, low-volume tests when the contact is strategically important. |
| Disposable | Remove from newsletters, automations, webinar follow-ups, and lead nurture. | Confirm disposable rows are not included in the verified campaign tag. |
| Role-based | Review before use. Addresses such as info@ and support@ can fit operational notices, but they usually underperform in personalized marketing campaigns. | Keep in a review tag when a teammate needs to decide case by case. |
| Import errors | Use Import history to reconcile skipped duplicates, syntax errors, invalid addresses, and role-based rows before the verified tag becomes a campaign source. | Review the error details while Mailchimp still makes them available. |
Keep the Workflow Moving
Once the Mailchimp audience is cleaned, the next useful step is to make verification part of every import, form export, and campaign-prep workflow.
Frequently Asked Questions
Related Guides
Try VeriMails Free
100 free credits on signup. No credit card required. Put this guide into practice today.
Start Free