How to Verify Emails in Google Sheets
Google Sheets is often the handoff point between Google Forms, lead magnets, sales exports, partner lists, and campaign tools. The sheet may look tidy, but the email column can still contain typos, role inboxes, disposable addresses, stale work emails, and catch-all domains. This guide shows how to export the active sheet tab as CSV, verify it with VeriMails, and import a cleaned result set without losing the original spreadsheet context.
TLDR
- Make a backup tab first, then export only the active Google Sheets tab that contains the email list you plan to use.
- Keep useful merge columns in the CSV, including name, company, source, segment, customer ID, or a simple row ID.
- Upload the CSV to VeriMails bulk verification; the email column is auto-detected and the other columns are preserved.
- Bring results back as a new Google Sheets tab, then filter by valid, invalid, catch-all, disposable, and role-based statuses.
- Use valid rows for campaigns, suppress invalid rows, and keep catch-all or risky rows in review tabs instead of your main send list.
Why Verify Your Google Sheets Contacts
A Google Sheet usually becomes useful before it becomes governed. A marketing team connects a Google Form to collect webinar signups. A founder pastes event leads into a shared sheet. Sales exports a CRM segment for a one-off campaign. Operations adds notes, tags, and source fields by hand. Each step is practical, but none of those steps confirms that an email address will actually accept mail.
Sheets can validate shape, not deliverability
Google Sheets formulas and data validation can catch obvious formatting problems, such as a missing at sign. That is helpful, but it is not email verification. A perfectly formatted address can still point to a domain with no mail server, a mailbox that was closed months ago, or a catch-all domain that refuses to confirm individual inboxes. Verification checks the mailbox against the receiving mail infrastructure instead of only checking what the text looks like.
Shared spreadsheets collect quiet data decay
Spreadsheet lists age quickly because they are easy to copy, duplicate, and reuse. Someone may have exported a list six months ago, merged it with a new form response tab, and never removed contacts who changed jobs. The sheet still opens and filters correctly, but the email column is no longer a reliable contact channel. A verification pass gives you a current deliverability status at the moment you plan to send.
Bad rows travel downstream
Most Google Sheets email lists are not the final destination. They are imported into a CRM, uploaded to an email marketing platform, pushed through an outreach tool, or copied into another sheet. If you move unverified rows downstream, the bad addresses move with them and become hard bounces later. A targeted email list cleanup at the sheet stage is easier to control than cleaning every downstream tool after a campaign has already failed.
Verification makes the sheet operational
A useful sheet tells the next person what to do. Adding verification status, reason, suggested action, and verified date columns turns a raw email column into an operational list. Teammates can filter valid rows for a campaign, isolate catch-all rows for manual review, remove disposable signups, and keep the original lead context intact.
Prepare the Sheet Before Export
Do a light cleanup before downloading the CSV. The goal is not to rewrite the dataset; it is to make sure the file you verify can be safely matched back to the original sheet.
- Pick the active tab deliberately. Google Sheets exports only the tab currently open when you choose CSV. If form responses, newsletter signups, and partner leads live on different tabs, export and verify each one separately.
- Add a stable row ID if the sheet does not have one. A simple column such as row_id or lead_id helps you merge results back without relying only on name or email values, especially when the sheet has duplicates.
- Keep context columns. Include source, segment, company, owner, lifecycle stage, and opt-in fields. VeriMails preserves those columns, and they are useful when deciding how to handle risky results.
- Remove obvious blanks, not edge cases. Delete empty rows and trim spaces if you see them, but do not manually guess whether a suspicious address is good or bad. Let verification classify it.
- Protect the original sheet. Create a duplicate tab or keep the exported CSV as a working copy. Import cleaned results as a new tab so you can audit the before-and-after state.
Google Sheets Operator Decisions
Make the export and import choices before verification starts. The safest spreadsheet workflow keeps the original tab intact and brings verified results back as a separate, filterable tab.
| Decision | Sheets setup | Operator note |
|---|---|---|
| Tab scope | Open the exact tab that contains the email list before downloading CSV. | Google Sheets exports a single active sheet as CSV, so separate tabs need separate verification runs. |
| Row matching | Add row_id, lead_id, customer ID, or another stable identifier before export. | This avoids confusion when duplicate email addresses or renamed contacts appear in the file. |
| Context columns | Keep source, segment, owner, opt-in, company, and campaign fields beside the email column. | VeriMails preserves these columns, which helps operators decide what to do with risky results. |
| Import target | Import the full verified CSV as a new sheet rather than replacing the source tab. | A new tab preserves the raw data and gives the team an audit trail. |
| Automation path | Use Apps Script or the VeriMails API only when row-by-row verification is truly recurring. | For most one-time or campaign cleanups, bulk verification is easier to audit. |
What VeriMails Checks
VeriMails runs each address from your Google Sheets CSV through a layered verification process and returns a clear status for each row. The same file can include names, companies, tags, and notes; the verifier focuses on the email column and keeps the rest of the row data with the result.
The process starts with syntax validation to catch malformed entries from form fills, copy-paste errors, or manual typing. DNS and MX checks then confirm the domain exists and is configured to receive mail. The decisive layer is a live SMTP handshake, where VeriMails connects to the receiving mail server and checks whether the mailbox accepts mail without sending a message.
VeriMails also classifies the cases that need judgment. Catch-all detection flags domains that accept mail for any address, which means the domain is reachable but the exact mailbox cannot be confirmed. Disposable detection identifies temporary inbox providers that often appear in free trial, webinar, or download forms. Role-based detection marks shared inboxes such as info@, sales@, or support@ so you can decide whether they belong in a personal outreach sequence. VeriMails returns clear verification results, and single checks typically return a clear status.
Pricing for Google Sheets Users
Most spreadsheet cleanups are inexpensive because one verification uses one credit. Every new VeriMails account includes 100 free verification credits with no credit card required, and those credits never expire. For a small form response sheet or a sample segment, that free balance may cover the entire run.
For larger Google Sheets lists, one-time credit packs start at 10,000 credits for $19, which is $0.0019 per email, and scale up to 5 million credits for $1,499. Credits never expire, so you can buy a pack once and use it across recurring sheet exports as new leads arrive. Teams that verify spreadsheets on a schedule can use monthly subscriptions instead, with annual plans from $12.50/month when billed yearly. The practical budgeting rule is simple: count the rows with email addresses, then match that row count to a credit balance.
The Workflow in Screenshots
These local Sheet and CSV examples show the workflow without exposing any private spreadsheet, Google account, or VeriMails dashboard data.
Step-by-Step Export and Import Workflow
Duplicate the source tab
In Google Sheets, duplicate the tab you plan to verify or make sure you have a reliable original. Name the working tab clearly, such as Leads to verify. Confirm that the email column has a header, and add a row_id column if the sheet will need an exact merge later.
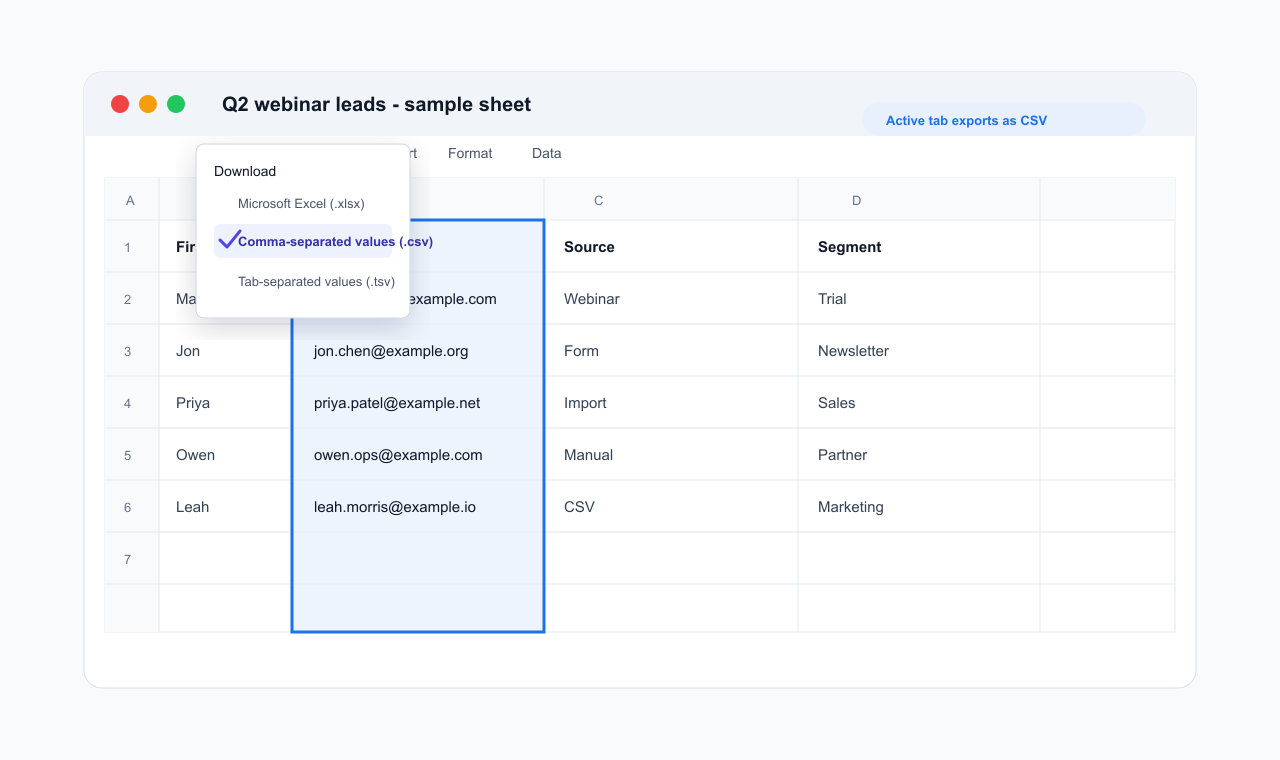
Download the active tab as CSV
Open the tab that contains the email addresses. Go to File, then Download, then Comma Separated Values. Google Sheets exports the active tab only, so repeat this step for each tab you want to verify. The CSV format is the right choice for bulk verification and preserves the row structure.
Upload the CSV to VeriMails
Sign in to VeriMails, open bulk verification, and upload the CSV. The uploader auto-detects the email column, so the header can be Email, Work email, Contact, or another clear label. The other columns stay attached to each row, which is important when you bring the results back into Sheets.
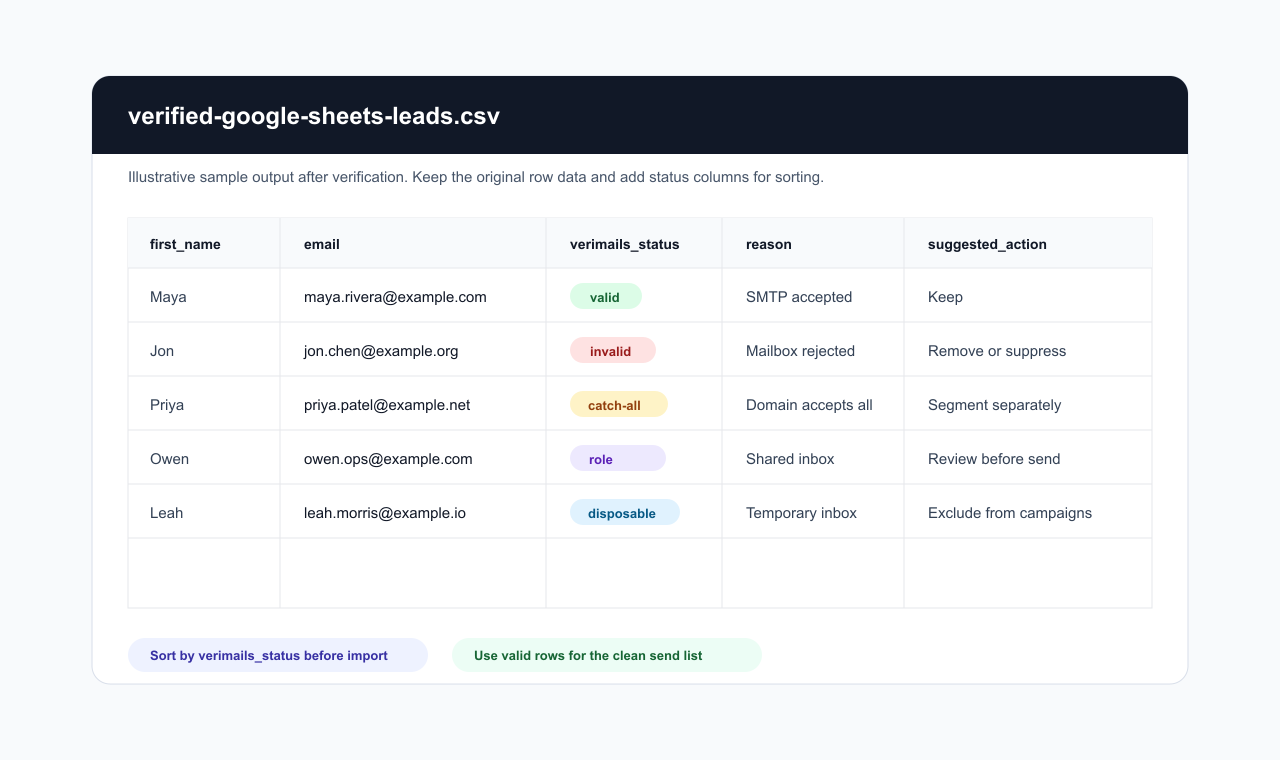
Download the verified results
When the job completes, download the result CSV. Use the filtered valid export if you only need a send-ready list, or download the full result file if you want every row back with status and reason columns. The full export is usually better for Google Sheets because it supports auditing and segmentation.
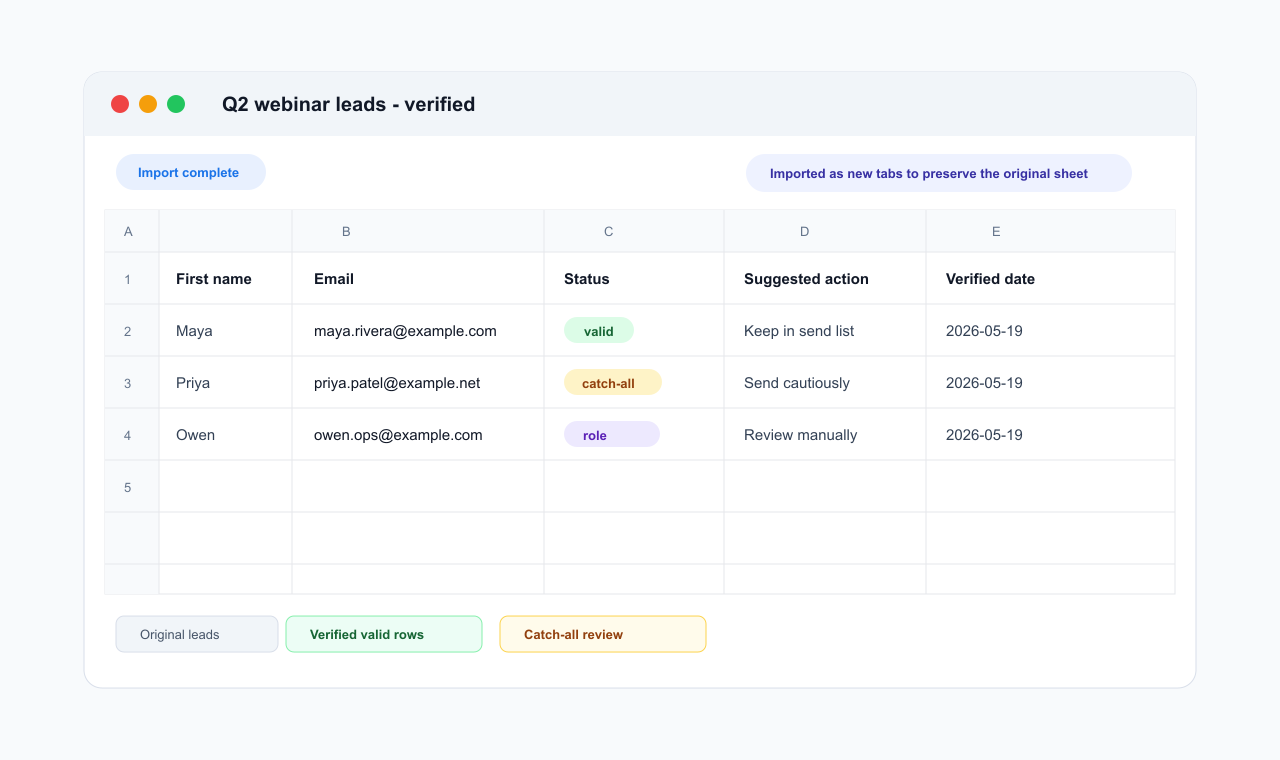
Import results as a new sheet
Back in Google Sheets, choose File, Import, Upload, then select the verified CSV. Choose the option to insert the data as a new sheet. This avoids overwriting the original tab and gives your team a clean place to filter, sort, and decide which rows should move into the next tool.
Filter by status before sending
Create filters on the status, reason, and suggested action columns. Build a valid-only tab for campaigns, an invalid tab for suppression, and a catch-all or risky tab for manual review. If you import into a CRM or email platform, use the row ID, email, or customer ID columns to avoid creating duplicates.
What to Do With Each Result
The safest way to use the verified CSV is to split it by status before importing it into any sending tool. Do not treat every non-invalid result as campaign-ready.
- Valid
- Use these rows for campaigns, CRM updates, or outreach imports. Add a verified date column so future users know when the status was last checked.
- Invalid
- Remove from send lists or import into a suppression tab. These are the rows most likely to hard bounce and raise bounce-rate risk.
- Catch-all
- Keep separate from valid rows and review the catch-all detection result. The domain accepts mail, but the server does not confirm the specific mailbox, so send only when the contact is valuable and volume is controlled.
- Disposable
- Exclude from lead nurture, lifecycle campaigns, and sales sequences. Disposable inboxes usually indicate low intent or short-lived access.
- Role-based
- Review manually. Addresses like info@ and support@ may work for operations messages, but they are usually poor targets for personalized outreach.
- Risky or unknown
- Keep in a review tab with the source and segment columns visible. Decide based on business value, consent, and campaign sensitivity.
Pre-Send Checklist
Before the cleaned tab is imported into a CRM or email platform, run a quick operator check so the spreadsheet does not lose the benefit of verification.
- Original preserved: The raw source tab is still available and the verified results live in a separate tab.
- Valid-only audience: Campaign or import tabs are filtered to confirmed valid rows only.
- Suppression ready: Invalid and disposable rows are saved in a suppression or rejected-leads tab.
- Review queue: Catch-all, role-based, and unknown rows are separated with source and owner columns visible.
- Counts reconciled: The raw row count, verified row count, and final send count match the rows you intentionally kept or removed.
Frequently Asked Questions
Related Guides
Try VeriMails Free
100 free credits on signup. No credit card required. Put this guide into practice today.
Start Free